DEAVI Structure
1 - Home
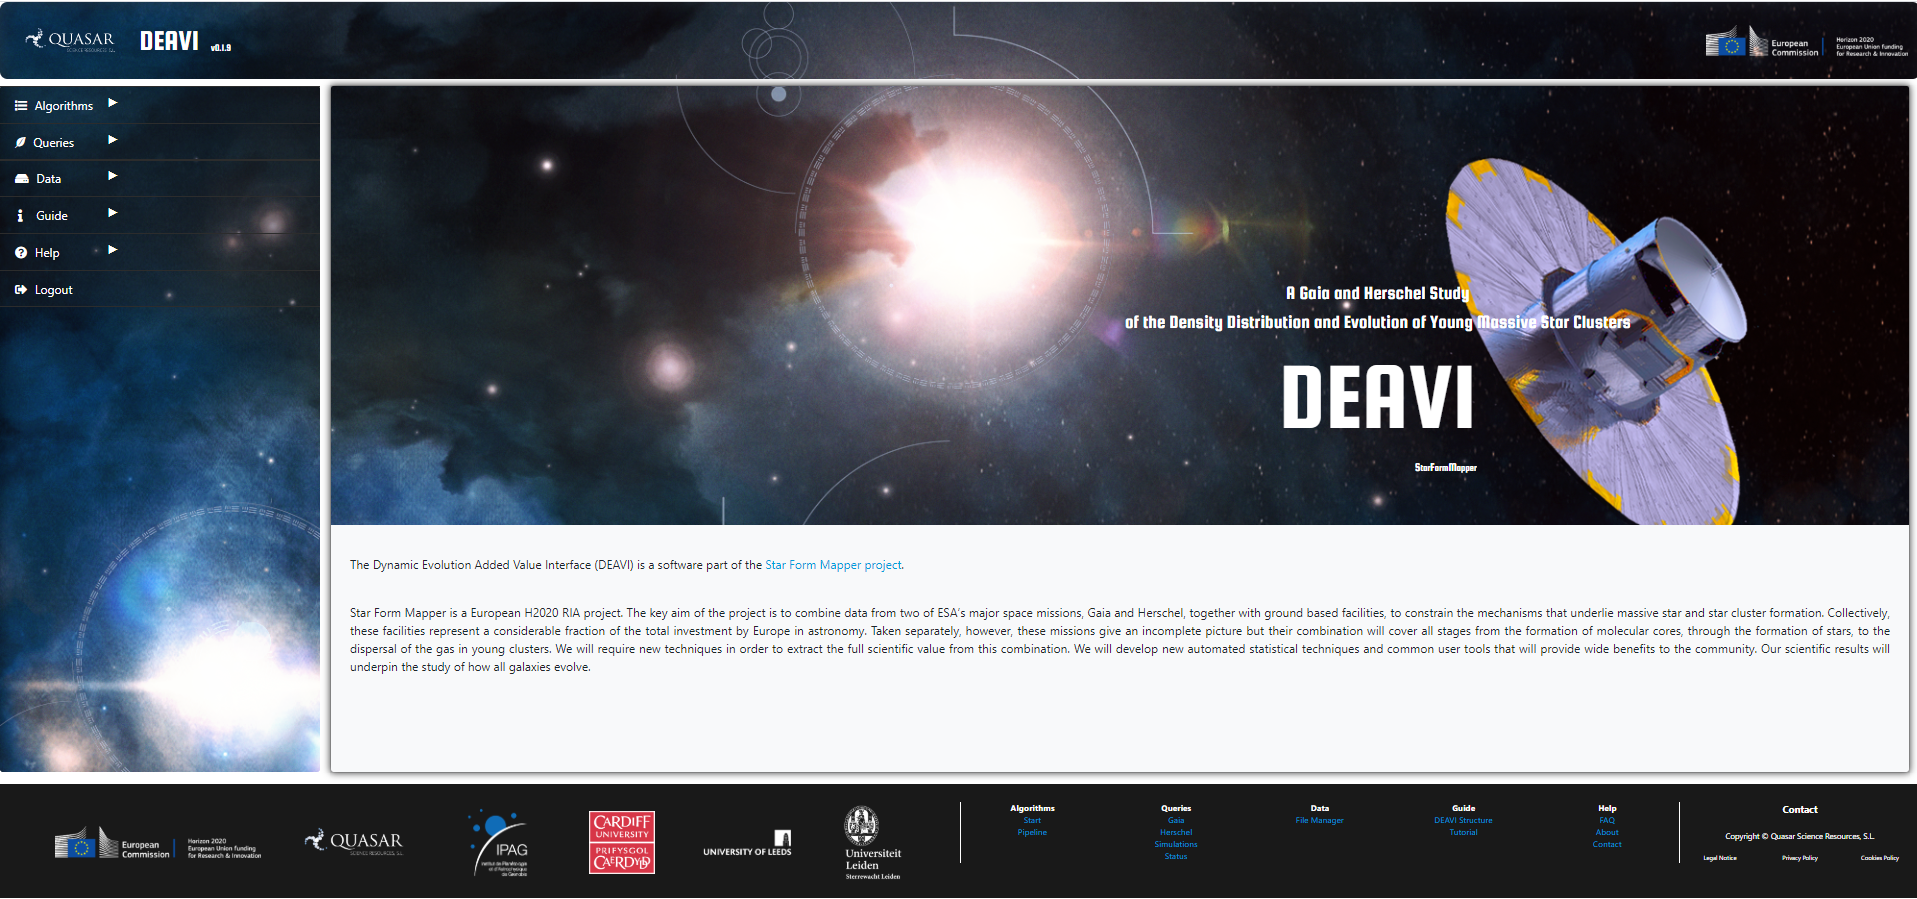
The home page is the most important element of DEAVI since it is the starting point of the user’s activity. It consists of a header, a side menu, a main container and a footer. Because this structure is maintained in the other pages of the application, we will explain these components in detail in this section.
1.1 - Header
The header has three interactive elements. The first two are located to the left where the Quasar logo and the acronym of the application, DEAVI (Dynamic Evolution Added Value Interface) and the current version are shown. When the user clicks on these items, they take you to the home page of the respective web sites. The other element is located on the right, the logo of the European Commission which is linked to the EU official website.

1.2 - Side Menu
The side menu is an element used in graphical interfaces to access the information contained in the application in an orderly manner. The DEAVI side menu has five components: Algorithms, Queries, Data, Guide and Help. In the following sections, each of them will be explained in detail.

When the user clicks on one of the elements, a new drop-down menu with the available options is displayed.

1.3 - Footer
The footer is the area that occupies the bottom of the web application.

It is divided into three parts:
Partners: In this section, the logos of the members of the projects and the EU Commission are shown. Each logo is linked to the official site of each member.
Pages: The central section is a sitemap, that is, displays the structure of the links contained in the website that define the navigation within the application. This allows the user to visualize and access all the content of the site in a direct way.
Our offices: The right section collects the contact information about Quasar Science Resources S.L., Spanish SME that has developed DEAVI. DEAVI users can contact QSR to report problems or issues they may have with the application.
1.4 - Main Container
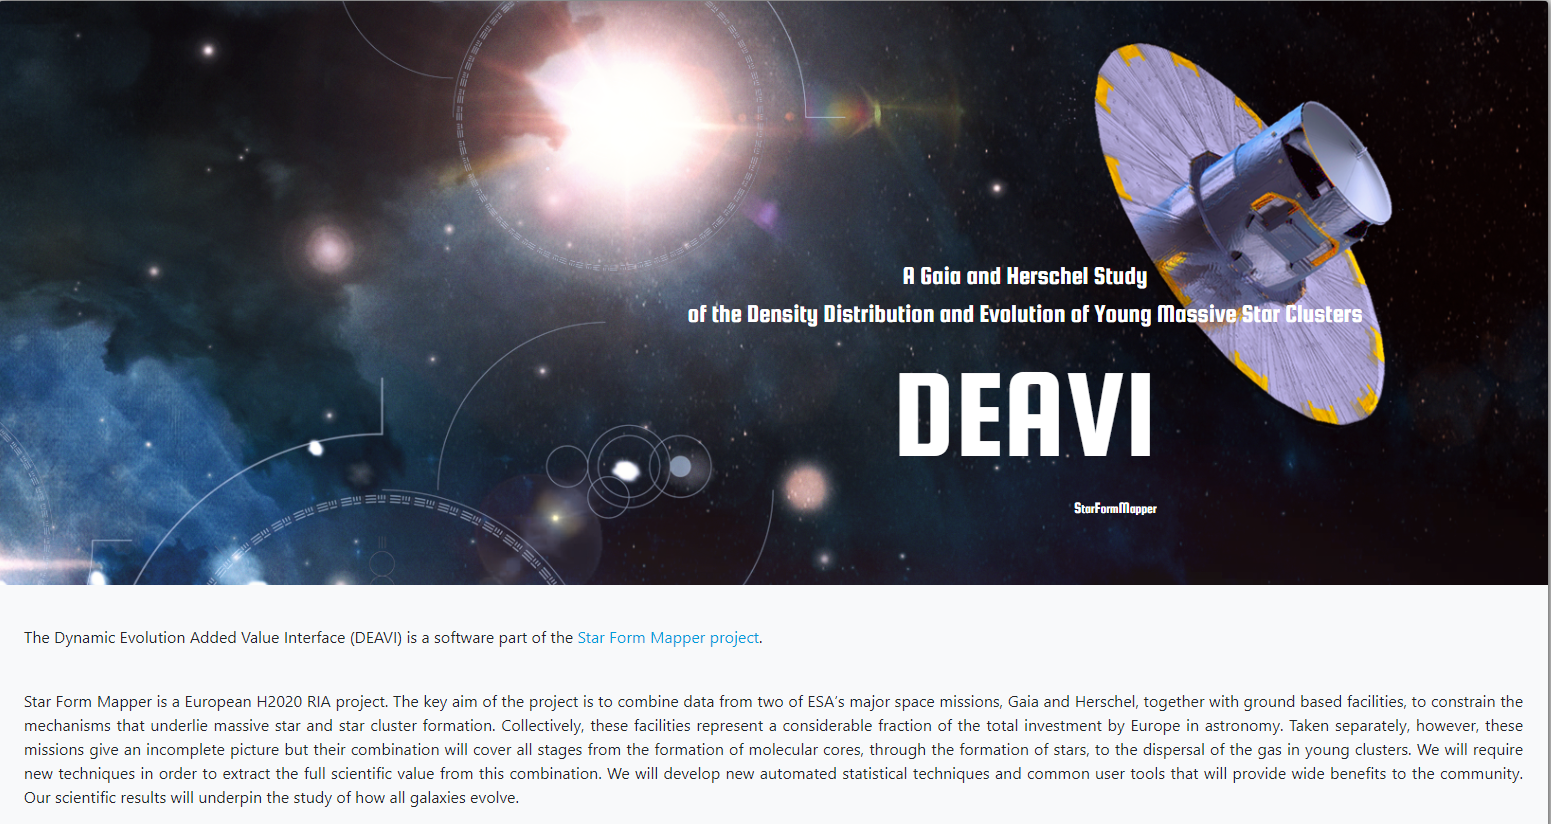
The last section in DEAVI is the main container. This component is common to all sections, so the information shown depends on the section visited using the side menu. In the case of the home page, a brief description of DEAVI and the SFM project within which the application has been developed are shown. In addition, the user can visit the project website, https://starformmapper.org/ , by clicking on the link provided.
2 - Algorithms
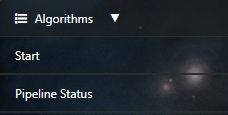
This section of DEAVI contains the set of scientific algorithms developed in the context of the StarFormMapper project. Each provided algorithm within DEAVI has been developed with one scientific goal in mind. A few simple examples have been included for the purpose of showing some of the functionalities implemented in DEAVI. This section includes two subsections: Start and Pipeline Status.
2.1 - Start
From the Start subsection the user can select the algorithm to execute. Two categories are available, Scientific and Examples.
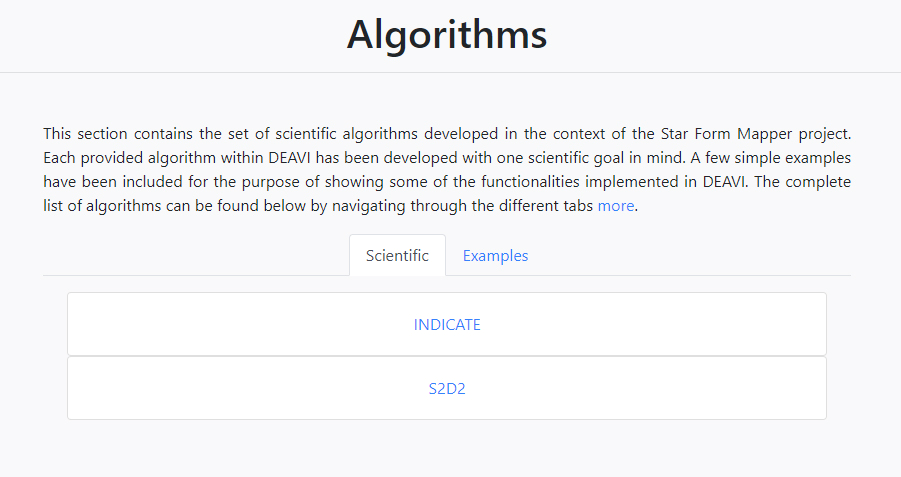
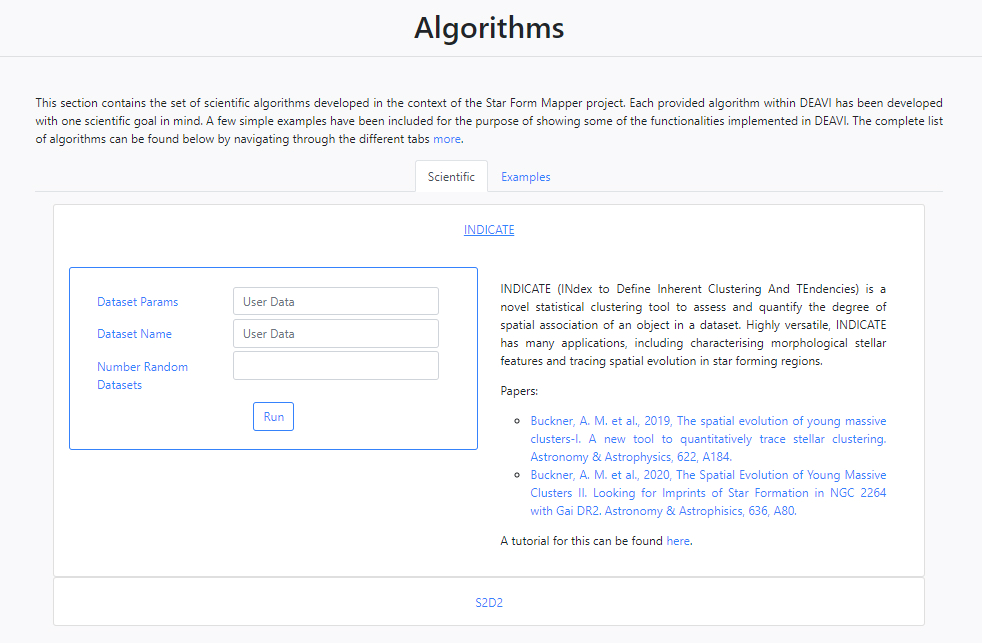
When the user clicks on one of these two categories, the list of available algorithms is displayed. Clicking on the desired algorithm brings up the list of input parameters and information fields. The figure below illustrates the case of the scientific algorithm INDICATE.
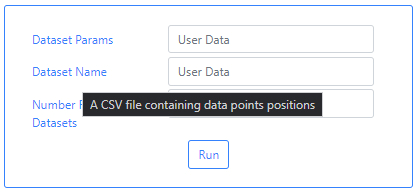
DEAVI implements a help system where by hovering (example below), and in some cases clicking on parameter names, specific help is displayed.
DEAVI also contains tutorials to guide you through each one of the algorithms with an example. A link is provided under each algorithm’s description to the right of the input parameter area. Scientific publications, where available, explain the details behind each algorithm and should be read for the correct interpretation of the results.
For more information on the available algorithms and how to use each one of them, see the Tutorials section.
2.2 - Pipeline Status
When an algorithm has been launched, the user can monitor the status of the execution on this page as well as to explore the results of the execution. This section also allows to interact with all the processing jobs and their results.
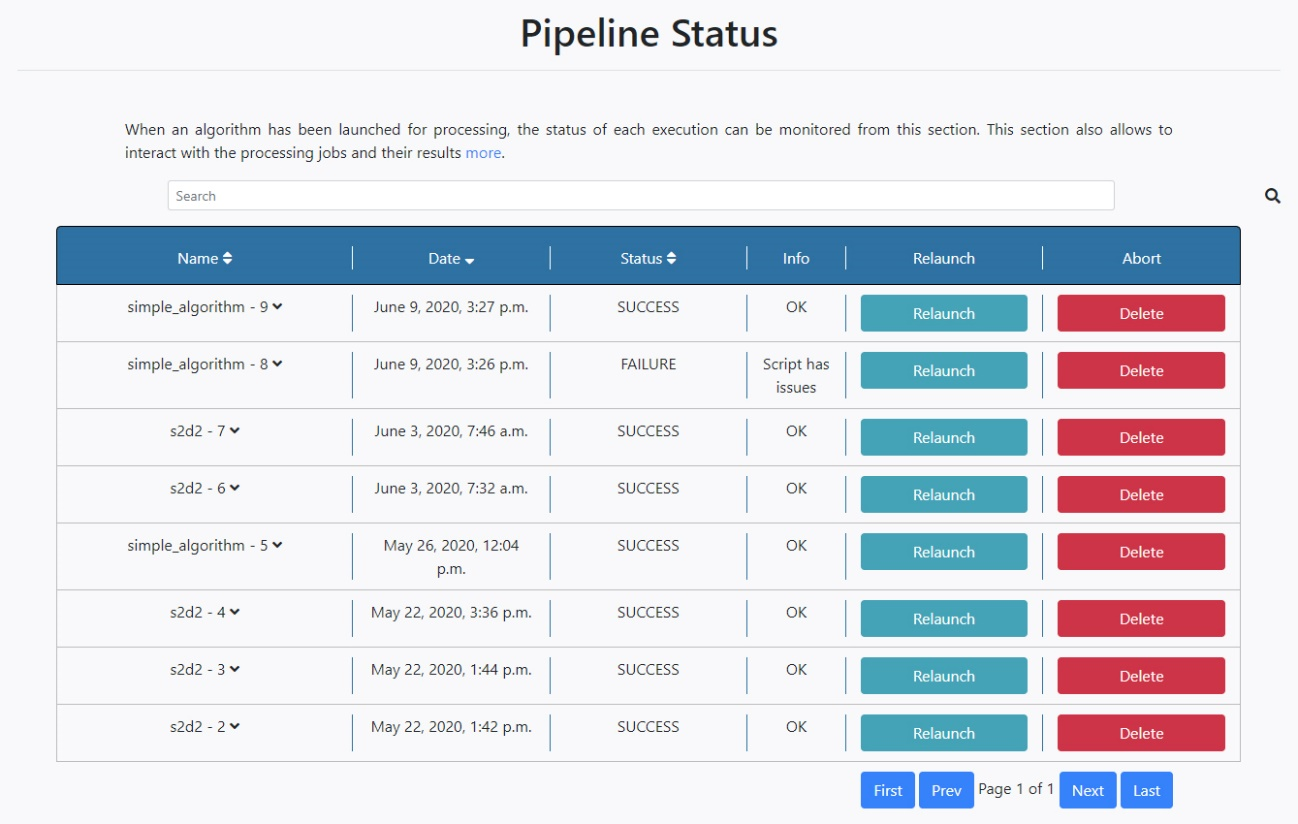
At the very top, the first element of this section consists of a search engine where a certain execution can be located. Just by typing, options will appear. Otherwise, the navigation buttons at the bottom of the table (First, Prev, Next and Last) can be used to search for specific executions.
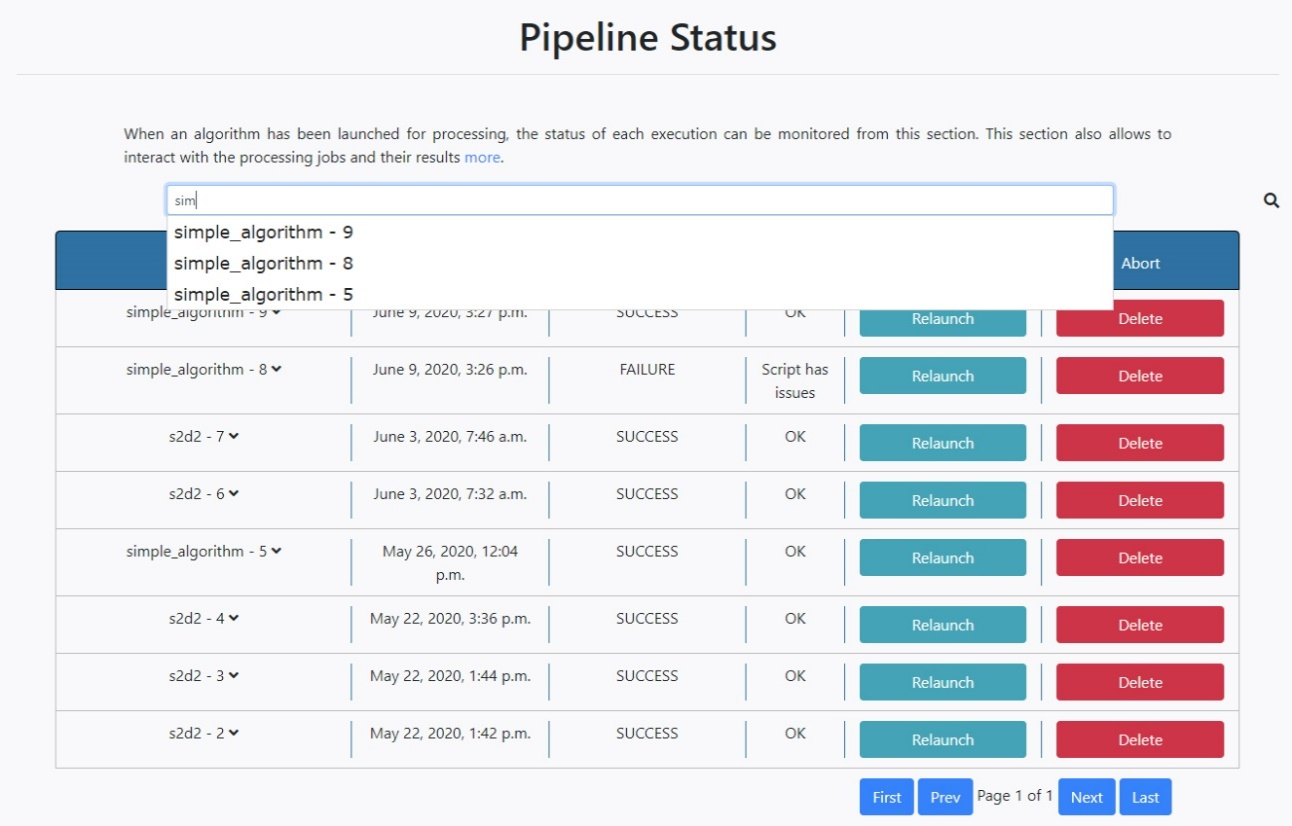
The second element displayed in this section is a table where the available executions are shown. The different columns indicate:
Name: Name of the execution.
Date: Date of the execution.
Status: Status of the execution (PENDING, STARTED, SUCCESS or FAILURE).
Info: this parameter gives information on whether the algorithm has errors in the syntax (Script has issues) or not (ok).
Relaunch: It allows to launch the execution again with the same configuration, or it also allows to redefine some parameters.
Abort: Stop or delete the execution.
Note that the user can sort out the executions by Name, Date and Status by clicking on each label in the table. This feature is maintained throughout all the tables of the same style present in the application.
When an execution of an algorithm has finished correctly (SUCCESS), the user can visualize the output of the algorithm by clicking on the arrow right next to the name of the execution. Each algorithm shows specific results or will include different output products, but all share three common sections: an area with a table showing the input parameters (Parameters) used for a particular execution, a table showing any output results (Output) and an area that will display any figures or plots.
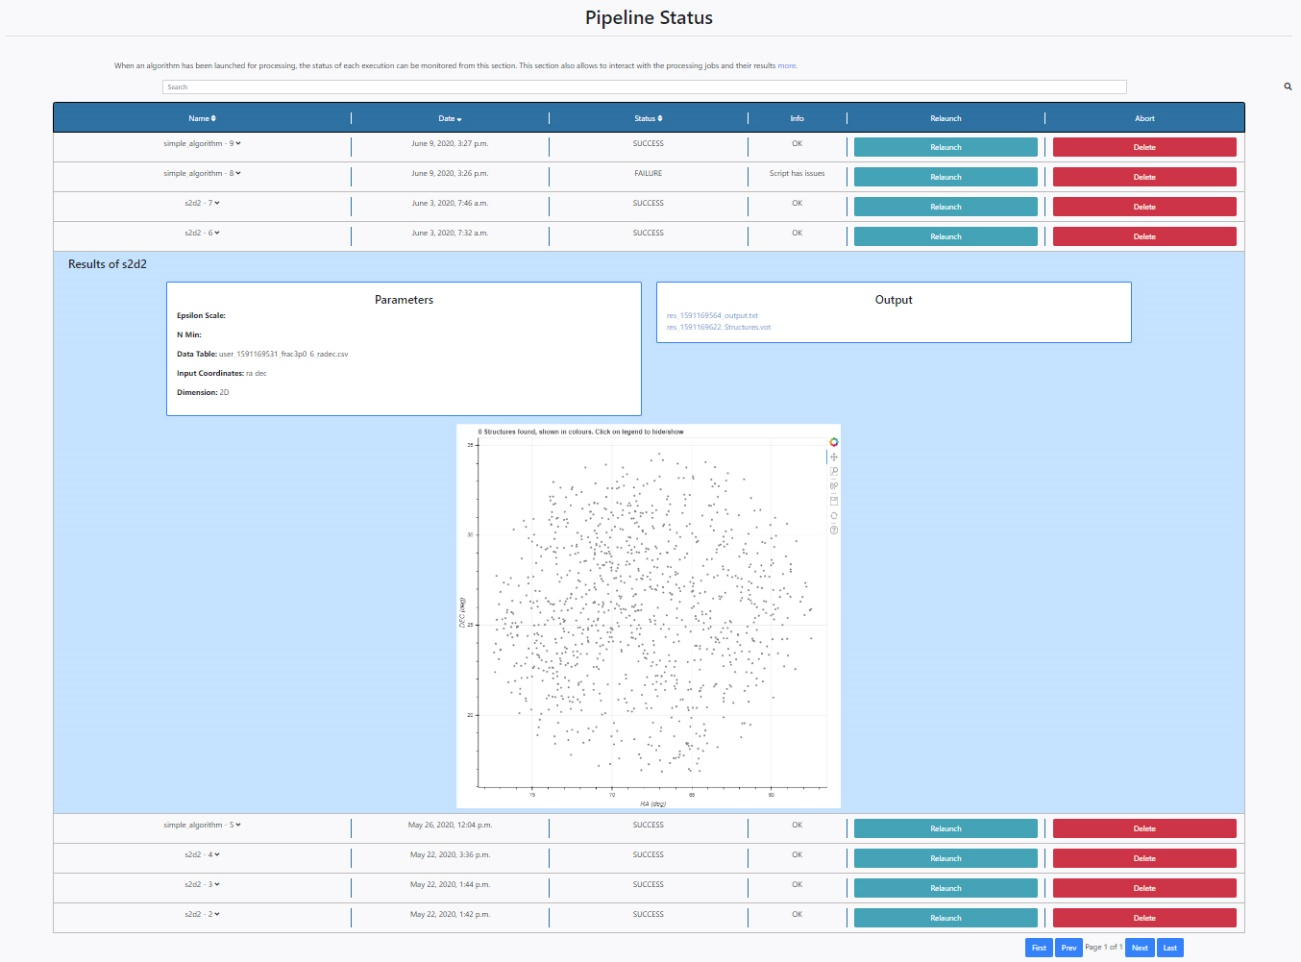
To the right of each execution there are two further buttons. A Relaunch and Delete button. Pressing the Relaunch button will open an interface to the input parameters of that specific algorithm.
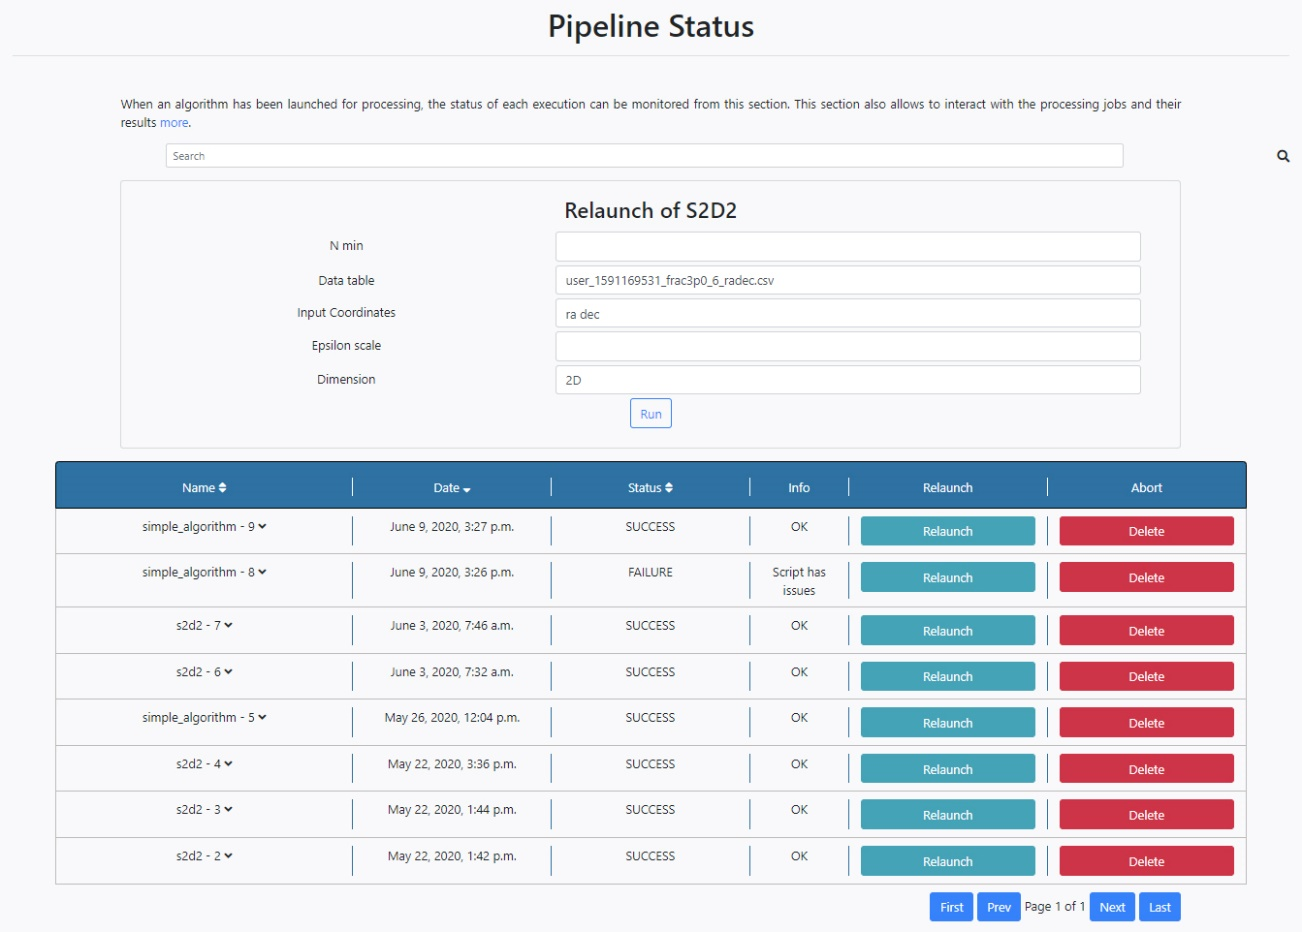
This allows to change any of the parameters before launching again another execution by pressing the Run button.
The Delete button will delete the corresponding execution. Pressing this button will also delete any output files generated by the algorithm.
3 - Queries
DEAVI allows to make queries to the archives of the ESA space missions Gaia and Herschel as well as the simulations created by the SFM project team. The queries to the Gaia and Herschel archives can be made through the official ESA web interfaces and the results of these queries downloaded to the user’s computer. These can be later uploaded to DEAVI since the results of these queries will be used as input to the algorithms. Using the provided interfaces in DEAVI to these two ESA mission archives has the advantage that the results of the queries are not downloaded to the user's computer, but are stored in DEAVI for future uses, avoiding also the movement of data through the network. The Queries section also contains an interface to a set of simulations produced within the SFM project. Last, a Status section is available to check the status of the queries and interact with them.
Specific tutorials are provided in the Tutorials section of DEAVI on the use of the different archive queries implemented in DEAVI. Here we provide a quick overview.
3.1 - Gaia
The user can make queries to the Gaia ESA archive by clicking on Gaia.
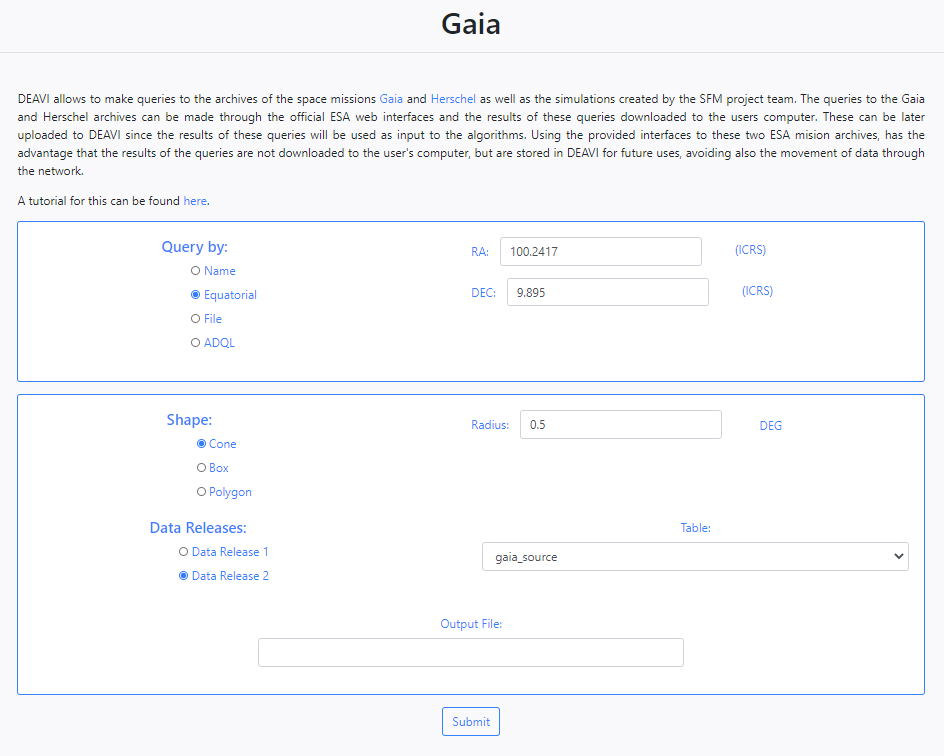
DEAVI implements a help system where by hovering, and in some cases clicking on parameter names, specific help is displayed.
The application provides four different ways of making queries.
- Name
The application allows you to make queries to the Gaia archive by name using the SIMBAD/NED name resolver. For example, if we enter M45, the query to star cluster Messier 45 will be made.
- Equatorial
The default option is search by equatorial coordinates. In this case the user must fill in the parameters of the coordinates Right Ascension (RA) and Declination (Dec). Different coordinate formats are allowed.
When using query by Name or Equatorial, at the bottom of the form, the user must choose the shape of the query (Cone, Box or Polygon),

When the shape of the query is a Cone, the user must enter the value of the radius in degrees. If the option chosen is a Box, the user must enter the height and width in degrees. In the case of a Polygon search, the user must fill in the value of the vertices separated by commas,

Next, the version of the Gaia data (Data Release 1 or Data Release 2) and the Gaia Table to be used in the query search must be selected. Last, a string can be given to be appended to the name of the output file.
- File
DEAVI also provides an option to make queries by uploading a file. To do this, the user must choose the File option and upload the file using the Choose File button that becomes available (depending on the browser this button can have a different caption).

The syntax that needs to be used inside the uploaded file is explained in a tutorial in the Tutorials section of DEAVI.
- ADQL
The last available option to make queries is through the use of the ADQL language. By default, choosing this option displays an example query.

When all the parameters of the query form have been filled in, clicking the Submit button at the bottom of the form will launch the query. By clicking on the Submit button, the application will automatically redirect and load the Status table of the Queries section. The results of the query are accessible through the Status table and will also be available through the File Manager in the Data section in the directory /Home/sources/gaia.
For more information on the use of ADQL to make queries, the archive or its products please visit the official ESA Gaia archive.
3.2 - Herschel
The user can make queries to the Herschel ESA archive by clicking on Herschel.
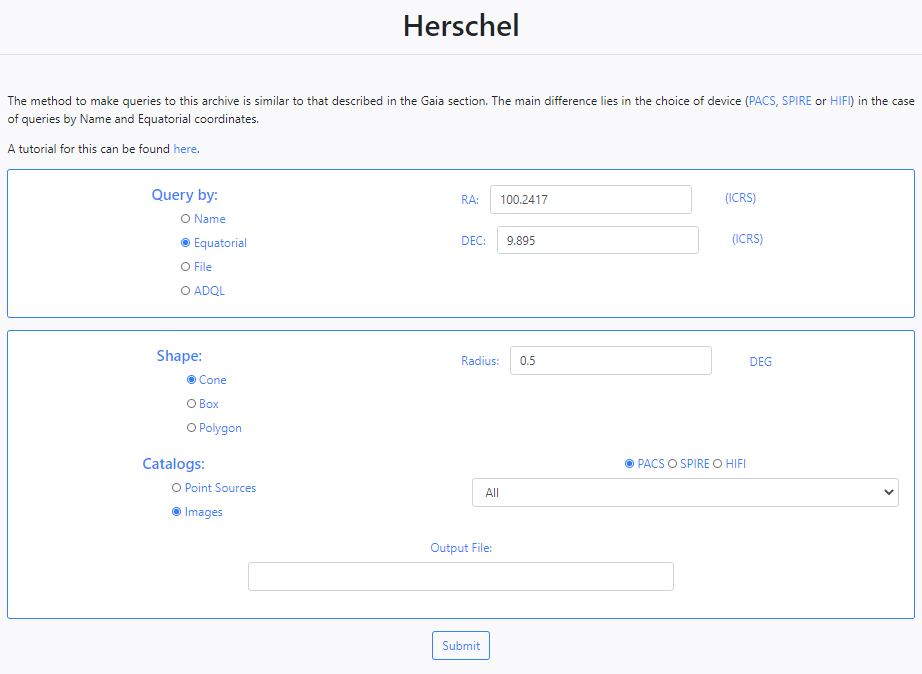
The method to make queries to the Herschel archive is similar to that described in the previous section for Gaia. The main difference lies in the choice Catalogue; Point Sources or Images. If Point Sources is selected a drop-down menu allows to search in a specific catalogue. If Images is selected, an instrument needs to be selected (PACS, SPIRE or HIFI) and a drop-down menu allows to select the product level.
When all the parameters of the query form have been filled in, clicking the Submit button at the bottom of the form will launch the query. By clicking on the Submit button, the application will automatically redirect and load the Status table of the Queries section. The results of the query are accessible through the Status table and will also be available through the File Manager in the Data section in the directory /Home/sources/hsa.
For more information on the use of the Herschel archive and its products, please visit the official Herschel ESA archive.
3.3 - Simulations
DEAVI allows to query on a set of simulations which have been produced with the code MYOSOTIS (Make Your Own Synthetic ObservaTIonS) which is designed to produce synthetic observations from simulated clusters. MYOSOTIS can synthesize observations from both ground- and spaced-based observatories, for a range of different filters, observational conditions and angular/spectral resolution.
The query form below allows access to this set of simulations. A tutorial explains in detail the contents of these simulations and how to access them using the parameters listed below.
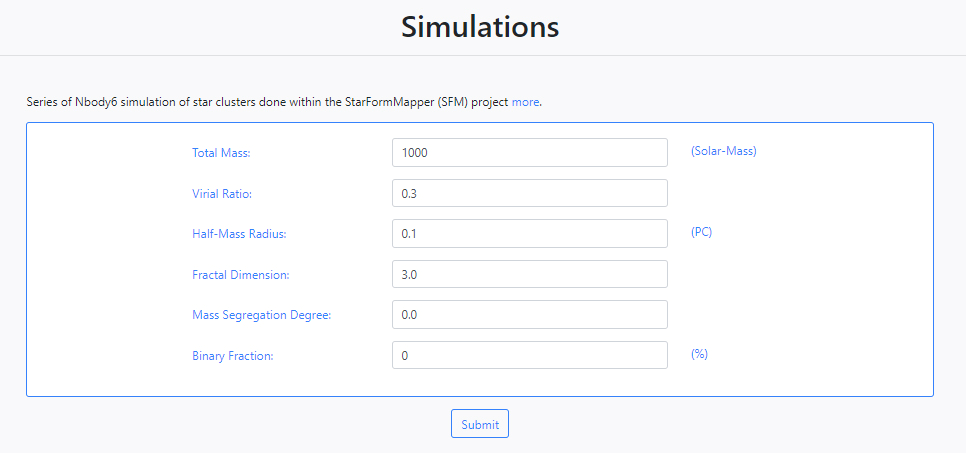
When all the parameters of the query form have been filled in, clicking the Submit button at the bottom of the form will launch the query. By clicking on the Submit button, the application will automatically redirect and load the Status table of the Queries section. The results of the query are accessible through the Status table and will also be available through the File Manager in the Data section in the directory /Home/sources/sim.
3.4 - Status
Once any of the queries are launched by clicking on the Submit button, the application will automatically load the Status table of the Queries section,
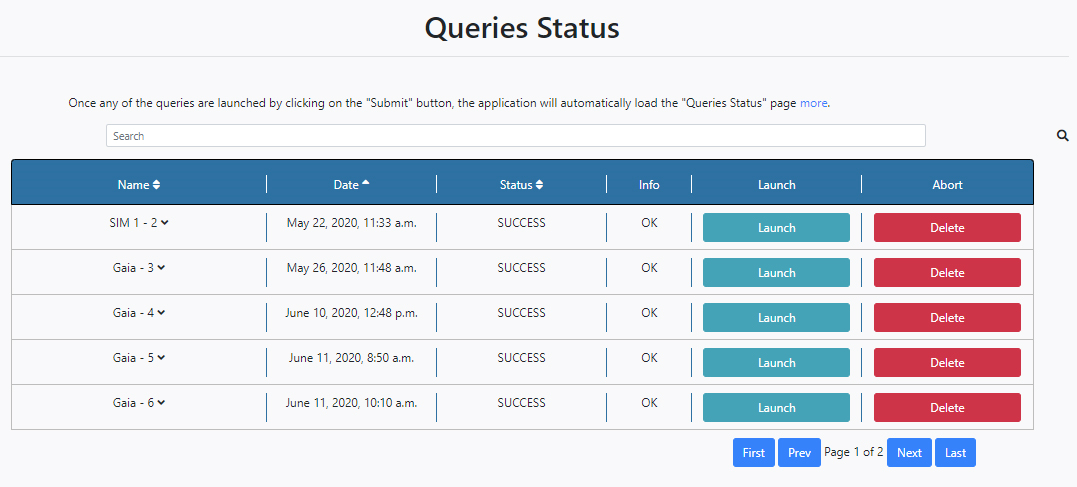
The operations and options available in this panel are self-explanatory and similar to those explained in the overview of the Pipeline Status in the Algorithm tab with some differences:
- The Status column has four possible status: PENDING, STARTED, ERROR and SUCCESS.
- The Launch button on the right of the panel opens up a further Select Algorithm field at the top of the queries with a drop-down menu where it is possible to choose an algorithm that will run over the results of that particular query.
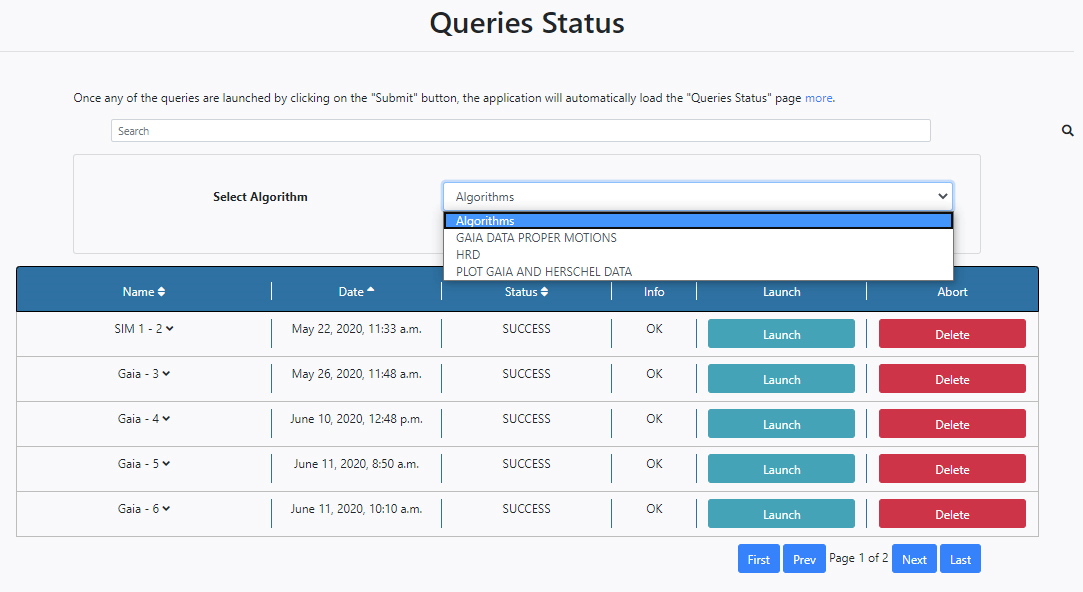
When an algorithm is selected from the drop-down menu, the configuration panel of the chosen algorithm is shown. It is then also possible to configure the algorithm parameters from here and launch the algorithm by clicking Run. In the example shown below the HRD Algorithm is selected and its parameters become available.
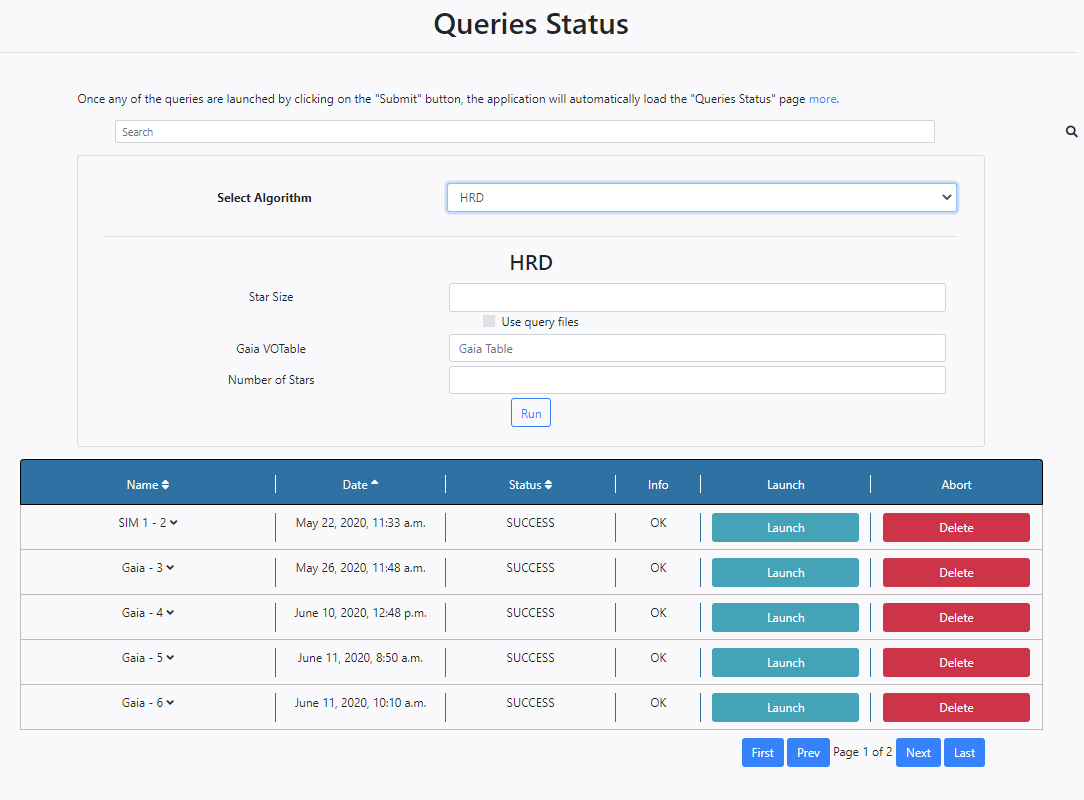
So, it is possible to launch algorithms directly from the Queries Status section.
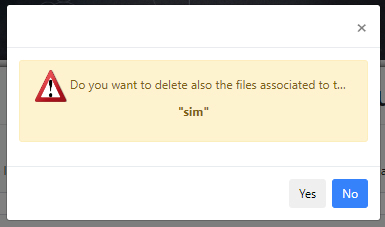
Pressing Delete, will delete the entry from this table. A pop-up window will ask if also the files associated with this query are to be deleted.
4 - Data
4.1 - Content
Within the Data section of the side menu, the user can navigate and interact with the downloaded (query results) or generated (by algorithms) files. For this, the user must click on Data and then on File Manager.
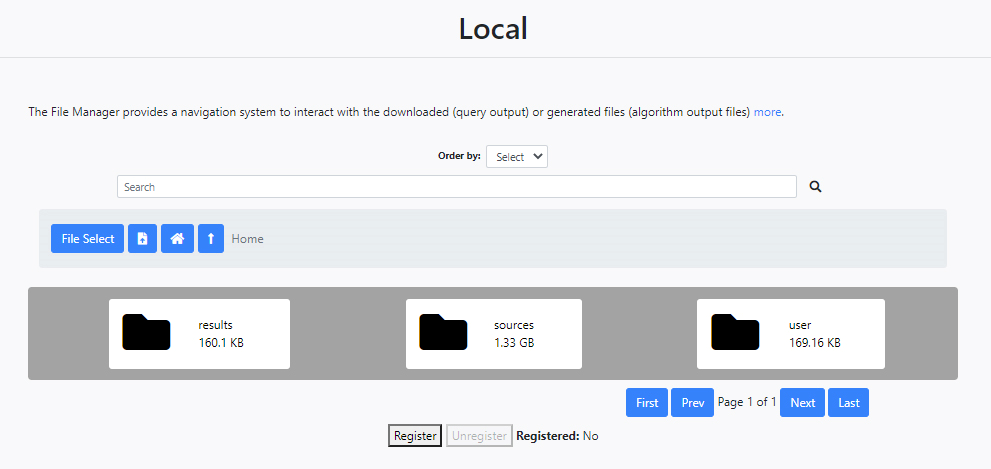
Every user has three folders:
- results: This folder contains all the files generated by the algorithms.
- sources: This folder contains in turn three separate folders to hold the files obtained from the Gaia (gaia folder) and Herschel (hsa folder) queries as well as those for the simulations (sim folder).
- user: This folder contains any files uploaded by the user which are needed by the algorithms.
4.2 - Browsing
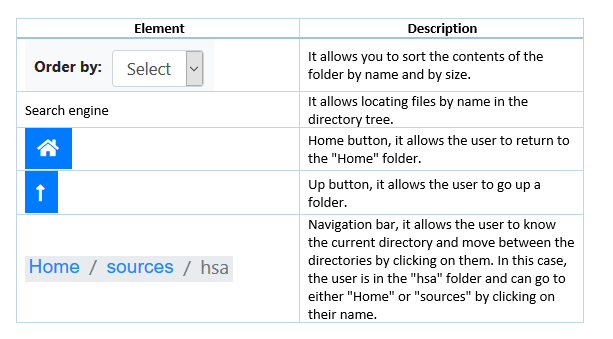
The section at the top of the folders panel has several useful features for location and browsing files within all the folders:
4.3 - Upload and download and delete files
- Upload files
DEAVI allows the user to upload files in two different ways:
-
Through the web interface of the application. The user has to select the file by clicking on the button,

Then, the user must click on the upload file button,

and the file will be uploaded.
-
Through the SAMP protocol. In this case, the user must first register the hub by clicking on the Register button,

Then, the status will change to Yes and the Unregister button will be activated if the hub is active. Otherwise, the application will inform the user that it has not located the hub,
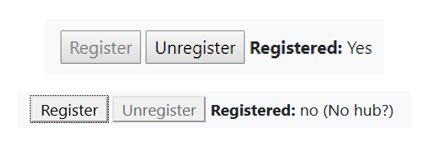
Note that the user must deactivate the mixed content of the web browser used.
- Download and Delete files
When the user views a certain file, its name, its size and the possibility of showing the content, downloading or deleting it are displayed. Below is an example of possible files contained under /Home/sources/gaia,

- Show content: When the user clicks on the file name, a new browser window is opened showing its contents.
Delete File: If the user clicks on the Delete button,

a pop up will appear reporting that the file will be deleted if the user clicks on Yes. If the user clicks on No, the pop-up window will be closed without deleting the file.

Download files Last, if the user clicks on the Download button,

the file will be downloaded to a local folder.
5 - Help
The last section of DEAVI is the Help section. In this section the user can find a Frequently Asked Questions (FAQ) section, an About section, and Contact information section.
